HTML5 offline apps for iphone

there’s some special meta tags you can put in a webpage to make your web apps avable and full screenable to the iphone hard drive. (so it can work offline) Here’s an example : http://mrgan.tumblr.com/post/125490362/glyphboard2 [or view source of http://mrgan.com/gb/]

There’s also frameworks like phonegap that let you access cocoa apis from javascript, but it sounds like you don’t need that.

answered Jun 25 ’09 at 13:18

Breton

via ruby – Develop iPhone app without a Mac? – Stack Overflow.

Reference: https://developer.apple.com/library/ios/documentation/AppleApplications/Reference/SafariWebContent/ConfiguringWebApplications/ConfiguringWebApplications.html

CHKDSK windows cmd line tool – Microsoft In-Depth discussion

Here is Microsoft’s in-depth discussion of what CHKDSK does. An overview can be found here.

This KnowledgeBase article claims to be about the new /C and /I switches, but the article goes on to say

To understand when it might be appropriate to use the /C and /I switches, you need a basic understanding of some of the internal NTFS data structures, the kinds of corruption that can take place, what actions CHKDSK takes when it verifies a volume, and what the potential consequences are if you circumvent CHKDSK’s usual verification steps.

So the article really winds up being about chkdsk in general.

Continue reading

CHKDSK Windows cmd line tool – Microsoft overview


(cuz the yellow highlight color below was chosen for white (light) chars on black background)
Here’s microsoft’s overview of the CHKDSK Windows command line tool.  An in-depth discussion can be found here.

Quote microsoft:

Chkdsk

Creates and displays a status report for a disk based on the file system. Chkdsk also lists and corrects errors on the disk. Used without parameters, chkdsk displays the status of the disk in the current drive. Continue reading

Intel® Rapid Recover Technology

Intel Matrix Storage Technology is a RAID system that uses firmware (bios) rather than hardware (on drives and/or on motherboard) or software (either within Windows or LInux, or in a driver or application program).

It has a disk-image like recovery feature:

Intel® Rapid Recover Technology (Intel® RRT): With the ability to instantly boot off a clone, Intel Rapid Recover Technology (part of Intel Matrix Storage Technology) provides a fast, easy-to-use method for the end user to recover their data and return their system to an operational status.

Whole Article: http://www.intel.com/design/chipsets/matrixstorage_sb.htm


Fixing “Access is denied” on a foreign drive

If you have an old drive you’re trying to use in a new computer, you might get an “Access is denied” error. The reason might be that the users on the old disk might be unrecognized by the current computer. (There are other reasons, eg, the file might have permissions set to disallow access. Also the file might be in use, in which case see “Unlocker” as described in Best Free Undeletable File Remover at techsupportalert.com But if not, read on:)

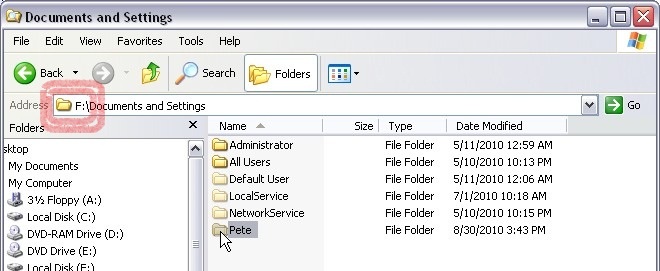
Say you’re trying to access folder “Pete” in the “F:” drive (an external drive, say, from an old computer).

00_and_14_pete_folder_highlited_ed

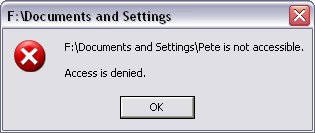
You might get an “Access is denied” error:

01_access_is_denied

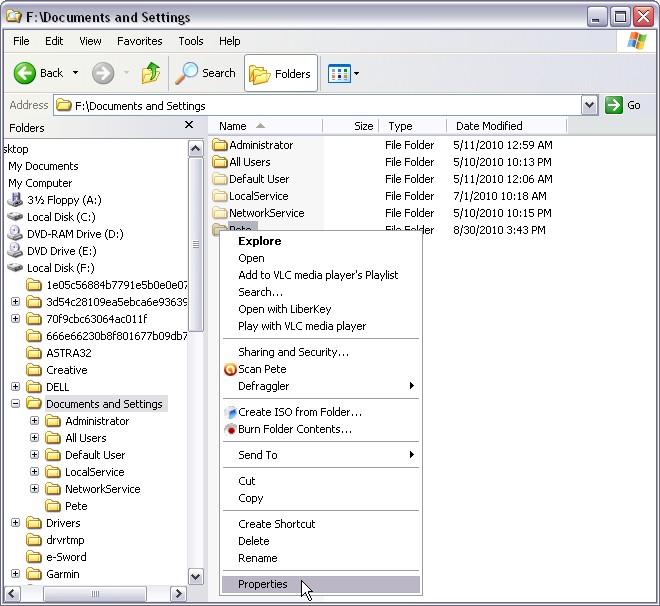
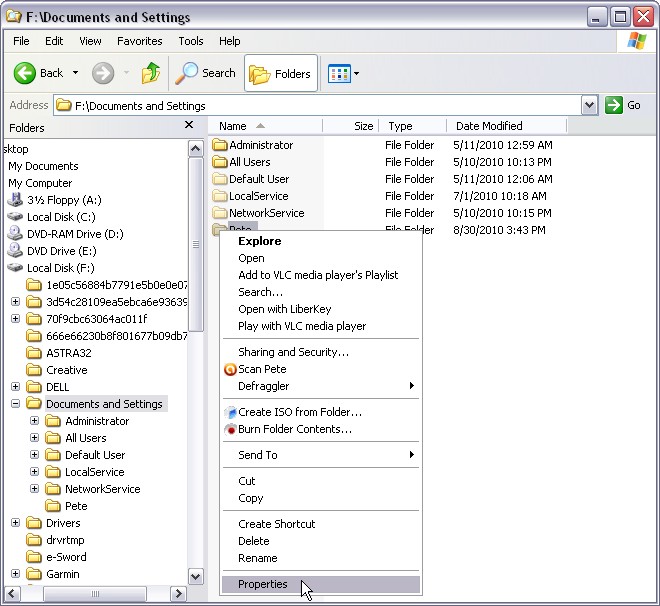
To fix it right click on the folder you want to access, and click “Properties”:
02_and_07_properties_right_click

The “Security” tab might be missing:

03_properties_no_security_tab

If the “Security” tab is missing, there’s an intermediate step. Click Tools -> Folder Options :

04_open_tools_folder_options_edited

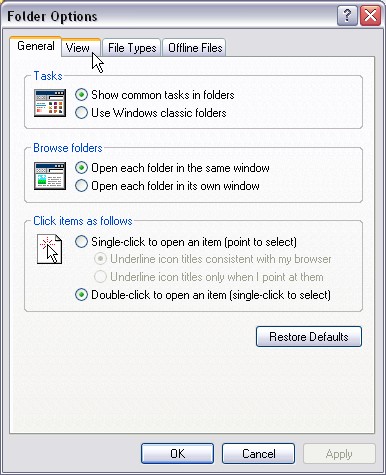
In the “Folder Options”, click the “View” tab:

05_folder_options_click_view

In the View tab, UNCHECK “Use simple file sharing (Recommended)”.  It may be “Recommended” but is it nevertheless sometimes not ideal.

06_uncheck_simple_file_sharing

Click “OK”.

Back to the folder you want to access (in the example “Pete”). Right click and select “Properties”:

07_and_02_properties_right_click - Copy

Now there should be a “Security” tab:

08_properties_with_security_tab

Click on the “Security” tab.

Note the Group or user names. If this is your problem, some will be missing, and some might be unrecognized or look strange. That “S-1-5-…” is a user from another PC (most likely the pc the drive came out of).  We want to add some here. Click “Add”:
09_properties_security_no_administrators_ed

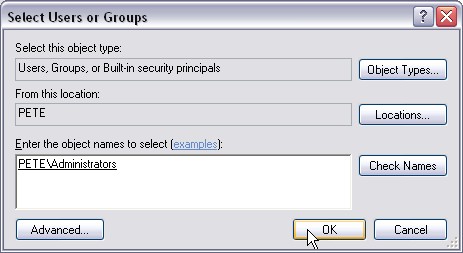
In the text box, add the user that needs access. On most Windows XP computers, it is sufficient to add “Administrators”. It is a user Group. Or, you might want to add your username on this computer. Or another user’s username. Click “Check Names”:

10_properties_security_add_type_administrators_check_names

If there’s no typo, Windows should change your text into a recognized username. In the example “PETE\Administrators”. In this case “PETE” is the computer name (happens to be the same as the user name and folder name in this example):

11_properties_security_add_type_administrators_name_found_click_ok

Click OK to get back to the Properties dialog box. Now the new username should be shown. Now look at the lower half, the Permissions. Some in the “Allow” column might be un-check’ed:

12_properties_security_with_administrators_click_full_control

If so, click the check box for “Full Control” to enable all permissions:

13_properties_security_with_administrators_with_full_control_on

Click ‘OK’ to return to the list of files.

14_and_00_pete_folder_highlited - Copy

Now double-click on “Pete” and you will have access! 😀
15_pete_folder_accessible

Hooray!


DRAM


Chips and modules

For use in Desktop computers, DDR, DDR2, DDR3 SDRAM is supplied in DIMMs (Dual Inline Memory Modules) with 240 pins and a single locating notch

Laptop DDR, DDR2, DDR3 SO-DIMMs, sometimes written without the dash: SODIMM, have 200 pins and often come identified by an additional S in their designation. The “SO” in SODIMM stands for “Small Outline”.

DIMMs are identified by their peak transfer capacity (often called bandwidth).

Standard name Memory clock(MHz) = 1/cycle
Cycle time(ns) = 1/clock Data rate(MT/s) = 2x clock Module name= rounded transfer rate Peak transfer rate(MB/s) = 8x Data Rate (8byes per Transfer) = 16x clock Timings[2][3](CL-tRCD-tRP) CAS latency(ns) = Timings * 1/2 * cycle
DDR
DDR-200 100 10 200 PC-1600 1600
DDR-266 133⅓ 7.5 266⅔ PC-2100 2133⅓ 2.5-3-3 18.75
DDR-333 166⅔ 6 333⅓ PC-2700 2666⅔
DDR-400A
DDR-400B
DDR-400C
200 5 400 PC-3200 3200 2.5-3-3
3-3-3
3-4-4
12.5
15
15
Standard name Memory clock(MHz) = 1/cycle
Cycle time(ns) = 1/clock Data rate(MT/s) = 4x clock Module name= rounded transfer rate Peak transfer rate(MB/s) = 8x Data Rate (8byes per Transfer) = 32x clock Timings (CL-tRCD-tRP) CAS latency(ns) = Timings * 1/2 * cycle
DDR2
DDR2-400B
DDR2-400C
100 10 400 PC2-3200 3200 3-3-3
4-4-4
15
20
DDR2-533B
DDR2-533C
133⅓ 7⅓ 533⅓ PC2-4200* 4266⅔ 3-3-3
4-4-4
11¼
15
DDR2-667C
DDR2-667D
166⅔ 6 666⅔ PC2-5300* 5333⅓ 4-4-4
5-5-5
12
15
DDR2-800C
DDR2-800D
DDR2-800E
200 5 800 PC2-6400 6400 4-4-4
5-5-5
6-6-6
10
12½
15
DDR2-1066E
DDR2-1066F
266⅔ 1066⅔ PC2-8500* 8533⅓ 6-6-6
7-7-7
11¼
13⅛
Standard name Memory clock
(MHz)
Cycle time
(ns)
Data rate
(MT/s) = 8x clock
Module name Peak transfer rate
(MB/s) = 8x Data Rate (8byes per Transfer) = 64x clock
Timings
(CL-tRCD-tRP)
CAS latency
(ns)
DDR3
DDR3-800D

DDR3-800E

100 10 800 PC3-6400 6400 5-5-5

6-6-6

12 12

15

DDR3-1066E

DDR3-1066F

DDR3-1066G

133⅓ 7 12 1066⅔ PC3-8500 8533⅓ 6-6-6

7-7-7

8-8-8

11 14

13 18

15

DDR3-1333F*

DDR3-1333G

DDR3-1333H

DDR3-1333J*

166⅔ 6 1333⅓ PC3-10600 10666⅔ 7-7-7

8-8-8

9-9-9

10-10-10

10 12

12

13 12

15

DDR3-1600G*

DDR3-1600H

DDR3-1600J

DDR3-1600K

200 5 1600 PC3-12800 12800 8-8-8

9-9-9

10-10-10

11-11-11

10

11 14

12 12

13 34

DDR3-1866J*

DDR3-1866K

DDR3-1866L

DDR3-1866M*

233⅓ 4 27 1866⅔ PC3-14900 14933⅓ 10-10-10

11-11-11

12-12-12

13-13-13

10 57

11 1114

12 67

13 1314

DDR3-2133K*

DDR3-2133L

DDR3-2133M

DDR3-2133N*

266⅔ 3 34 2133⅓ PC3-17000 17066⅔ 11-11-11

12-12-12

13-13-13

14-14-14

10 516

11 14

12 316

13 18

* Some manufacturers label their DDR2 modules as PC2-4300, PC2-5400 or PC2-8600 instead of the respective names suggested by JEDEC. At least one manufacturer has reported this reflects successful testing at a higher-than standard data rate[4] whilst others simply round up for the name.

Note: DDR2-xxx denotes data transfer rate, and describes raw DDR chips, whereas PC2-xxxx denotes theoretical bandwidth (with the last two digits truncated), and is used to describe assembled DIMMs. Bandwidth is calculated by taking transfers per second and multiplying by eight. This is because DDR2 memory modules transfer data on a bus that is 64 data bits wide, and since a byte comprises 8 bits, this equates to 8 bytes of data per transfer.

To clarify 2 similar acronyms:

SRAM – Static RAM – this type of memory is used in various places in various chips in the PC (but not main memory, nor hard drisk drive main storage). It is used in caches and register files.

SDRAM – Synchronous Dynamic RAM – this is the type of memory people mean when they say “my pc has 4GB of memory” (4GB is typical in 2013).

Even tho they both start with ‘S’ one is Static and the other is not. In one case the ‘S’ means “Static” and in the other it means “Synchronous”.

Another memory term:

SODIMM – Small Outline DIMM. Ie laptop memory.

Also begins with ‘S’ but in this case the ‘S’ means “Small”.

2 other terms:

“Volatile” means memory that is lost when power is applied. Examples are the memory (not the hard disk drive) inside your computer.)

“Non-Volatile” means memory is still store when power is turned off. Examples are flash, as in usb drives. Eg usb drive retains its storage when unplugged.)

Reference: Random-access memory on Wikipedia

ERUNT vs Tweaking.com Registry Backup?

Backing up the Registry is important, especially if you’re going to try a Controversial Registry Cleaner.

ERUNT  (readme) sounds great as a registry backup because it backups up the actual FILES rather than the “contents” of your Registry.  Many programs backup the contents and to restore is awkward and might not work.  But with ERUNT, if your system does not boot (and thus many other backup/restore methods are unavailable) you can use the venerable COPY dos command to restore. Or the ERDNT.EXE in the backup dir can do it for you.

But Tweaking.com (who’s “Windows Repair (All In One)” is recommended on techsupportalert.com and which I’ve used twice with splendid success) also has a Registry Backup: http://www.tweaking.com/articles/pagesprinter/tweaking_com_registry_backup_online_help.html

It talks about 2 possible problems with ERUNT

  1. not backing up other users, just the current one.
  2. perhaps invalidating other programs’ handles (presumably to the registry)

Quoting that Tweaking.com page:

A lot of registry backup programs use the RegSaveKey API, such as ERUNT. When using the API you can only backup loaded registry files. [Only the current user’s registry NTUSER.DAT file is loaded, and so only it is backed up. -MM]

Tweaking.com – Registry Backup uses the volume shadow copy service instead. This allows perfect backups of the registry files and all profiles on the system.

Quote From Microsoft:

“Applications that back up or restore system state including system files and registry hives should use the Volume Shadow Copy Service instead of the registry functions.”

“Using RegSaveKey together with RegRestoreKey to copy subtrees in the registry is not recommended. This method does not trigger notifications and can invalidate handles used by other applications.”

By using the Volume Shadow Copy instead of the RegSaveKey API this registry backup program is safer to use.

Is Tweaking.com Registry Backup really safer than ERUNT, as its author claims? I’m not sure i *want* to trigger those notifications when i’m backing up the registry. That’s nobody’s business, right? But what about that “invalidate handles used by other applications”? I can see that might be a problem when *restoring* using RegRestoreKey–maybe that doesnt trigger the handle. But on save? Who needs to see that? Or is Micro$oft just trying to make sure *their* digital eyes see everything, even saves?

On the 2nd issue, the backing up of other users registry files is valid, ERUNT even says so. http://www.larshederer.homepage.t-online.de/erunt/erunt.txt


References

How to Backup the Windows Registry at techsupportalert.com


Program Uninstallers (Programs that uninstall other programs)


“Uninstallers” are programs that uninstall other programs, like Windows “Add or Remove Programs” or “Programs and Features” does.  These programs are replacements for Windows “Add or Remove Programs” or “Programs and Features”.

My fav is ZSoft Uninstaller.

CAVEAT: ZSoft Uninstaller and another popular choice, “Total Uninstall” both have what’s called a “snapshot method.”  The “snapshot method” works by taking a picture of your registry and your files before and after the install of a program.  So, yes, you have to be alert to this before you install the program.  If your program is already installed, you have to use ZSoft’s more benign method, or Revo Uninstaller (which i also like and used for a while).

I think Steven Avery at DonationCoder.com phrased it extremely well:

1) One caution on the snapshot method.  Installs sometimes go ahead and install .Net components or Visual Basic or Visual C++ or maybe other semi-system components, perhaps Java as well.  A snapshot method would by default go back and try to undo those parts of the install, which can cause problems.

My take — note carefully during the install whether anything like this occurs and if so — note this carefully where you won’t forget (perhaps a dummy folder name) — the simplest is uninstall in the more generic Revo-style way, rather than the snapshot way. Or if you do the snapshot method anyway, come up with your plan on how to handle this.  (e.g. Java is less of a problem because you could use JavaRa and then reinstall).  However I think you would normally simply not use the snapshot method if such external components are installed. Some of our accomplished Total Commander users might share with us their experiences on this aspect.

That aside, ZSoft Uninstaller can be very helpful in cleaning up after an install.  Revo Uninstaller can do this too.  I ALWAYS check to make sure what I’m deleting is ok to delete.  When in doubt, i leave it.  So this feature is for somewhat advanced users.

I also think Steven Avery (still at DonationCoder.com) gave a really good summary of the options available:

Uninstaller roundup, with the emphasis on 3 solid in-depth programs.

Revo Uninstaller, Total Uninstaller and ZSoft Uninstaller.

And 7 more down below.  Half of the 10 are freeware.  Ok, on recount there are 11, 6 free, but we can consider FARR a special case. From the System Restore thread :

Revo Uninstaller
http://www.revouninstaller.com/  (no forum)

is very good, far, far better than Windows Add/Remove (its a shell around Add/Remove, giving additional features and better searching.) And it is what I use, although I rarely uninstall.

If you ever need to have “closest to 100%” uninstallation then you go to :

Total Uninstall – powerful installation monitor and advanced uninstaller – $30
http://www.martau.com/tu.php
Forum
http://www.martau.com/forums/
Last Freeware Version
http://www.aplusfreeware….tegories/util/uninst.html

And the third major player.

ZSoft – freeware
http://www.zsoft.dk/index/software_details/4
Forum
http://forum.zsoft.dk/
Zsoft Uninstaller  (10/2007)
http://www.donationcoder….m/index.php?topic=10333.0

Here are solid discussions of the three, with some other mentions.

http://forum.piriform.com…index.php?showtopic=15858
Total Uninstall or Revo Uninstaller, Which is best (which should i keep) (Piriform Forums)

http://www.techsupportale…-program-un-installer.htm
Best Free Program Un-installer – Gizmo

http://www.lifehacker.com…windows_systems_on_the_g/
Clean Windows Systems on the Go with Revo Uninstaller Portable

http://www.lifehacker.com…_crapware_from_your_pc-2/
ZSoft Uninstaller Removes Crapware from Your PC

(Note the developer’s informative comments at bottom, acknowledging lacks as well as new features. I’ll chop ’em up.)

“Total Uninstall … takes snapshots before and after …the best way … ZSoft Uninstaller can do this too … Revo searches for leftovers .. the current version of ZSoft Uninstaller doesn’t do this …the newest beta … does have this feature – search the desktop, start-menu, send-to menu, application data folder, ‘application main folder’, and registry for leftovers (if you tell it to)”

The problem with Total Uninstall (which I used awhile) and any before-and-after-snapshot style is that it can make the installation far more cumbersome.  Who wants to do that for anything but the most complicated installs ? (Maybe some sort of Visual Studio or Dreamweaver or a complicated virtual sandbox pseudo-defense system.)  Or an install that you really have doubts about.  (Does TU work very well in a simple no-snapshot mode ?  Dunno, there are a couple of reviews on onsite and here and there.) With Revo and ZSoft around for free .. most don’t want to purchase a program that is only marginally better.  However, since you may only want a Total in specialty cases, the humoungous installs,  it might be good to at least have the last freeware Total version ready, or use ZSoft snapshot.

Note that ZSoft is used in both modes, so if he is truly enhancing his “clean-up after” mode, as in the comments above, ZSoft becomes a very interesting freeware alternative.  I haven’t checked for any comparisons after his new release went the post-remove cleanup route.  Maybe in his forum there are some discussions.

In here I have included most of the dedicated Donationcoder uninstaller threads for a couple of years, but there are some goodies around 2005-2006, especially about Total Uninstaller.

Seven more with solid reps:

farruninstall – FarrUninstall plugin for Find and Run Robot
http://code.google.com/p/farruninstall/
FARR Uninstall Plug
http://www.donationcoder….um/index.php?topic=9246.0

MyUninstaller – Nirsoft (freeware)
http://www.nirsoft.net/utils/myuninst.html
My Uninstaller – Donationcoder 2008/02
http://www.donationcoder….m/index.php?topic=12406.0
Remove Item In “Add/Remove Programs” 03/2009
http://www.donationcoder….m/index.php?topic=17637.0

Absolute Uninstaller – Glarysoft – freeware
http://www.glarysoft.com/absolute-uninstaller/

Safarp – Open Source – Freeware (2005) – lite, fast
http://wistinga.online.fr/safarp/
Forum – http://wistinga.sourceforge.net/forums/  some activity 2007-2008

Advanced Uninstaller Pro – $40
http://www.innovative-sol…com/uninstaller/index.htm
Forum
http://www.innovative-sol…92f287f4f&showforum=4

Your Uninstaller – $40 (bundle deal some like)
http://www.ursoftware.com/product/uninstaller/
Your Unistaller 2008 just released.
http://www.donationcoder….m/index.php?topic=11254.0

Uninstall Tool – $25
http://www.crystalidea.co…=show_page&name=utool

Smarty Uninstaller – $20
http://www.winnertweak.com/uninstaller/

================================================================

As I rethought this, I made my own decision (sort of a recommendation).  Everyone should consider having two programs handy.  One like Revo for the basic uninstall situation.  Revo is the unqualified leader, ZSoft is just trying now to be right there in the mix, and a bunch of others are definitely very good, with their own style and advantages, if you are using them and happy — clap your hands. You can stick with them fine.  Even Windows Add/Remove alone is .. usually .. sometimes .. ok.  Most of this is not mission critical.

And in the back holster we have the snapshot program.
Which generally is either :

Total Uninstall $30
Total Uninstall Last Free Version
ZSoft

(Putting aside some possible techie possibilities that are less automated like RegShot, that might be helpful, at least for visibility.  And  probably for some people the two programs will be one.  ZSoft being the only one, perhaps, with both snapshot for the toughies .. and post-dinner cleanup for the regular .. a feature which many like .. and also free.)

You may use this snapshot install-uninstall once every few months, or never, but when you get that humoungous program that you are taking on a demo, or that problematic program that you want to try out .. the one that is known to leave hundreds of registry entries and little .dlls everywhere .. then you load up TU or ZSoft !

So we have successfully bifurcated the uninstalling suggestions !

Shalom,
Steven Avery

« Last Edit: April 02, 2009, 01:00:24 PM by Steven Avery »


References

“Uninstaller Roundup – Revo – Total – ZSoft & the less magnificent seven” at DonationCoder.com

“Best Free Program Uninstaller” at techsupportalert.com

How to uninstall Symantec Endpoint Protection v11 WITHOUT the uninstall password

Symantec Endpoint Protection (SEP) aims to protect very, very well.  To that end, it embeds itself into the Operating System very deep, and in many places, and in many ways.  Unfortunately, this slows down your computer, especially if it’s old, eg an old Windows XP computer.

It is also why SEP comes with an uninstall password.

Note that SEP is usually installed by a business who will install a central server (SEPM) and then regular SEP on all their clients (laptops, desktops).  So let’s say your company lets you keep your laptop.  Well how are you going to get that SEP off there?  It wont keep working forever.

There are various ways i found on the net.

Before doing anything make an image of your hard drive, so you can restore (Important!) if things go horribly wrong

Here are methods i found:

  1. Try the default password symantec.From http://www.symantec.com/connect/articles/how-uninstall-symantec-endpoint-client-if-uninstall-password-place
  2. HKEY_LOCAL_MACHINE\SOFTWARE\Symantec\Symantec Endpoint Protection\AV\AdministratorOnly\Security\UseVPUninstallPassword

    Set to 0 to disable.

    From: http://www.symantec.com/connect/forums/uninstalling-endpoint-without-password

  3. HKEY_LOCAL_MACHINE\SOFTWARE\Symantec\Symantec Endpoint Protection\SMC

    Change the value for SmcGuiHasPassword from 1 to 0

    From: http://www.symantec.com/connect/forums/uninstalling-endpoint-without-password

  4. HKEY_LOCAL_MACHINE\SOFTWARE\Symantec\Symantec Endpoint Protection\SMC

    delete the smcexit key

    From http://www.symantec.com/connect/articles/how-uninstall-symantec-endpoint-client-if-uninstall-password-place

  5. HKEY_LOCAL_MACHINE\SOFTWARE\Symantec\Symantec Endpoint Protection\SMC

    look for smcinstdata key; delete it

    From http://www.symantec.com/connect/articles/how-uninstall-symantec-endpoint-client-if-uninstall-password-place

  6. Manually change the Policy:  Click HELP AND SUPPORT -> TROUBLESHOOT -> Export the Policy from Policy Profile to an .xml file.
    Edit the .xml file to set

    AdminPassword ExitNeedPassword, UINeedPassword, ImportExportNeedPassword, UninstallNeedPassword

    Set the Value as “0”.  Re-import.

    from here: http://www.symantec.com/connect/blogs/remove-smc-password-without-applying-policy-server

  7. cmd line smc -stop to stop the service after removing password
  8. When the password comes up, use Task Manager -> Processes (or Sysinternals Process Explorer) to kill the msiexec.exe process.From: http://helpdeskgeek.com/help-desk/uninstall-symantec-endpoint-protection-without-a-password/


References:

Methods for uninstalling Symantec Endpoint Protection


How to map disk drive names in Device Manager to volume letters like C: E: F: G:

When you go into Device Manager and click on Disk drives you see entries like

Maxtor 7Y250M0

WD6400AAKS-00E4A0


[FYI all those “0” are zeros -MM]

But it doesnt tell what driver letter, eg C:, D:, E:, F: etc it is.

There happens to be an excellent question and answer about this (by the same person) on answers.microsoft.com.

The short answer is there’s a “Volumes” tab in disk drive device properties.

The long answer is:

  1. Once you’re already in Device Manager with Disk drives expanded,
  2. Right-click on a disk drive device and select “Properties”.
  3. Click the “Volumes” tab
  4. Click the “Populate” button.
  5. The drive letter like F: should appear under the “Volume” column in the lower half of the dialogue box.

That’s the drive letter for that device.

Or, you can do it from “My Computer” or “Windows Explorer” :

  1. Double click on “My Computer” or Start -> Programs -> Windows Explorer or Start -> Run -> explorer
  2. Navigate to “My Computer” or “Computer” (showing the list of drives with their drive letters)
  3. Right-click on a drive (it doesnt matter which one), and select “Properties”
  4. Select “Hardware” tab
  5. Click on one of the drive device names (you have to do this for every name, in turn)
  6. Click the “Properties” button (yes you’re now in the Properties of the Properties–welcome to Windows)
  7. Click the “Volumes” tab
  8. Click the “Populate” button.
  9. The drive letter like F: should appear under the “Volume” column in the lower half of the dialogue box.

If you’re trying to map a particular drive letter, like C: to its device name, you will have to keep repeating these steps from step 5, trial and error fashion, for each drive device name until you find the one that has volume C:.

I’ll post pictures here of each step if i get the time.

For reference, “jabloomf’s” concise posts from answers.microsoft.com :

Question

jabloomf asked on 2/12/2010 3:57:32 AM

Matching drive Letter with physical drive

I know there must be a simple way of doing this. I have 5 SATA drives on my Windows 7 system. The boot drive (C:) and another drive (E:) are 150 GB WD Raptors. The two Raptors are connected to the mobo’s [motherboard’s] SATA1 and SATA4. But how can I tell whether the C: drive is on either SATA1 or SATA4? All in can see in the Device Manager is the drive S/Ns. In disk management, all I can see are the drive letters and the drive type, but not the S/N. I know that I could power down, unplug one of the drives from the mobo and see what happens when I reboot, but I was wondering if there was some way to find out from the OS.

The only other way I decided that it might be possible to find out is to use the BIOS to examine the S/Ns and try booting from each drive using the BIOS and see what happens.

And his answer:

Answer

jabloomf replied on

Thanks, but I figured it out a different way, in case anyone is interested. You click on the drive Properties from the Windows Explorer. Then you click on the Hardware tab and click on the drive caption. For a 150 GB WD Raptor the caption (or name) looks something like:

WDC WD1500AHFD000RAR4 ATA Device

Then click the Properties button and then the Volumes tab. Then populate the Volumes and you have a match of the drive caption and the drive letters. The drive caption is also shown in the BIOS, so you can confirm that you’ve matched the correct physical drive with both the drive letters and the SATA port.